
Simpleaf is a command line toolkit written in rust that exposes a unified and simplified interface for processing scRNA-seq datasets using the alevin-fry ecosystem of tools. In simpleaf version 0.15.0, we introduce the re-designed simpleaf workflow module, which provides the ability to execute complex and highly-configurable single-cell data processing workflows consisting of simpleaf commands and shell commands, described by simple user-provided Jsonnet programs. One can fetch published simpleaf workflow templates from our protocol library, protocol estuary, using the simpleaf workflow get program or develop custom templates to achieve specific tasks.
In this tutorial, we will walk you through the procedure of obtaining a published workflow template, instantiating it by filling in the information, and executing the workflow, using a workflow designed for processing 10x feature barcode data. If you are interested in developing a custom workflow template, please check this tutorial.
A real example for processing 10X Feature Barcode data
10X Feature barcoding technology is a powerful method for adding extra layers of information to our single-cell gene expression data. Currently, 10X supports antibody capture and CRISPR guide capture via feature barcoding. However, adding additional information also means that the data processing of single-cell data with feature barcoding is more complex than single-cell gene expression data alone. For example, to process a feature barcode antibodies experiment from 10x Genomics, one usually needs to invoke 10 extra commands, including preprocessing, barcode translation, and the actual data processing steps, comparing with gene expression data alone.
simpleaf workflow is designed to turn these complicated but fixed workflows into a simple fill-and-go process: In most cases, one just needs to provide the path to the input files in a workflow template in Jsonnet Jsonnet format, so that the functions and logics encoded in the template can automatically complete the details of the workflow and generate a workflow manifest. In this example, we will show how to fetch, fill, execute and patch the workflow designed for processing 10X feature barcode antibodies data using the 1k PBMCs dataset with a panel of feature barcode antibodies dataset. Other published workflow templates, for example, for processing data from CITE-seq, 10X feature barcode antibody + CRISPR, and standard 10X Chromium 3’ v2 and v3 gene expression, are all available for fetching using simpleaf workflow get.
0. Install simpleaf
Before everything, we should install simpleaf and the underlying tools. Here we assume you are on a Linux machine and you use conda. For more complicated cases, such as Apple silicon or conda is not available, you can read this tutorial to properly set up simpleaf.
conda create -n simpleaf -y -c bioconda -c conda-forge simpleaf piscem
conda activate simpleaf
This command usually will install the latest version of simpleaf. To use the re-designed simpleaf workflow module, please ensure that the installed simpleaf is at least in version v0.15.0.
$ simpleaf --version
simpleaf 0.15.0
1. Set up simpleaf
We need to set it up properly to make simpleaf ready to use. In the following command, we define the ALEVIN_FRY_HOME environment variable, configure simpleaf, and allow simpleaf to create a large number of intermediate files. A detailed description of these steps can be found in this tutorial.
# create a working directory
export AF_SAMPLE_DIR=$PWD/simpleaf_workdir
mkdir $AF_SAMPLE_DIR
cd $AF_SAMPLE_DIR

# define env variable
export ALEVIN_FRY_HOME="$AF_SAMPLE_DIR/af_home"

# simpleaf configuration
simpleaf set-paths

# update the maximum number of file descriptors a program can create
ulimit -n 2048
2. Download the dataset
Usually, a 10X feature barcode dataset contains two parts:
- The FASTQ files of gene expression reads and feature barcode reads.
- the feature reference file containing the barcode sequence of all the Feature Barcode reagents used in an experiment.
Here we download these files, plus the human reference files, into the working directory.
# define the path to the input file and folder
FASTQ_DIR="$AF_SAMPLE_DIR/data/pbmc_1k_protein_v3_fastqs"
FEATURE_REF_PATH="$AF_SAMPLE_DIR/data/feature_reference.csv"
REF_DIR="$AF_SAMPLE_DIR/data/refdata-gex-GRCh38-2020-A"
mkdir -p $FASTQ_DIR
mkdir -p $REF_DIR

# download FASTQ files
wget -qO- https://cf.10xgenomics.com/samples/cell-exp/3.0.0/pbmc_1k_protein_v3/pbmc_1k_protein_v3_fastqs.tar | tar xf - --strip-components=1 -C $FASTQ_DIR

# Download feature reference path
wget -v -O $FEATURE_REF_PATH -L https://cf.10xgenomics.com/samples/cell-exp/3.0.0/pbmc_1k_protein_v3/pbmc_1k_protein_v3_feature_ref.csv

# Download human reference genome build and gene annotations
wget -qO- https://cf.10xgenomics.com/supp/cell-exp/refdata-gex-GRCh38-2020-A.tar.gz | tar xzf - --strip-components=1 -C $REF_DIR
3. Get the workflow configuration file
We need to call the simpleaf workflow get program to fetch the workflow template. This program takes a workflow name via the --name flag and an output directory via the --output flag, and dumps the workflow-related files, including the workflow template, of the queried workflow into the output directory. In this example, we will query the 10x-feature-barcode-antibody workflow for processing 10x feature barcode antibody data. One can ask simpleaf to list all available templates by calling the simpleaf workflow list program.
# Make sure you have the latest protocol estuary
simpleaf workflow refresh
simpleaf workflow get --name 10x-feature-barcode-antibody -o $AF_SAMPLE_DIR
This command will dump all files into a directory named by the workflow name plus _template, under the output directory passed to --output. For this example, those files locate in $AF_SAMPLE_DIR/10x-feature-barcode-antibody_template.
$ ls $AF_SAMPLE_DIR/10x-feature-barcode-antibody_template

10x-feature-barcode-antibody.jsonnet
The 10x-feature-barcode-antibody.jsonnet is the actual workflow template that should be completed and passed to the --template flag in the simpleaf workflow run. This template, after instantiated, can produce a valid simpleaf workflow manifest to instruct simpleaf to invoke the correct commands for processing our data. Like all other simpleaf workflow templates, this file is in Jsonnet format. You can think of it as a JSON configuration file, but with cool features enabled, such as variables, functions, and useful operators.
4. Instantiate the workflow template by filling in the required information
In most cases, the only thing we need to do to instantiate the workflow template is to fill in the missing fields in its fast_config section. These missing fields usually represent the path to the required files.
The fast_config section in the 10x-feature-barcode-antibody.jsonnet looks like the following but with all comments, which will help us to understand the meaning of each field, removed.
fast_config : {
    gene_expression : {
        splici : {
            gtf : null,
            fasta : null,
            rlen : 91,
        },
        map_reads : {
            reads1 : null,
            reads2 : null,
        },
    },
    antibody_capture : {
        feature_barcode_csv : null,
        map_reads : {
            reads1 : null,
            reads2 : null,
        },
    },
},
There are 7 missing (null) fields in the section, and here we talk about what they are and how to fill them in. Basically, We need to replace those nulls with the return string of the following code chunks. Please remember to “quote” them!
-
In the
gene_expressionsection:-
fasta: This field takes the path to the genome fasta file in the human reference set. This file is used for building the reference index. To get this, run the following command:echo $REF_DIR/fasta/genome.fa -
gtf: This is the path to the gene annotation gtf file in the human reference set. This file is used for building the reference index. To get this, run the following command in the terminal:echo $REF_DIR/genes/genes.gtf -
reads1: This field takes the path to the gene expression reads1 FASTQ files (technical reads). To get this, run the following command in the terminal:reads1_pat="_R1_" find -L ${FASTQ_DIR}/pbmc_1k_protein_v3_gex_fastqs -name "*$reads1_pat*" -type f | sort | awk -v OFS=, '{$1=$1;print}' | paste -sd, - -
reads2: This field takes the path to the gene expression reads2 FASTQ files (biological reads. To get this, run the following command in the terminal:reads2_pat="_R2_" find -L ${FASTQ_DIR}/pbmc_1k_protein_v3_gex_fastqs -name "*$reads2_pat*" -type f | sort | awk -v OFS=, '{$1=$1;print}' | paste -sd, -
-
-
In the
antibody_capturesection:-
feature_barcode_csv: This file takes the antibody feature reference file. To get this, run the following command in the terminal:echo $FEATURE_REF_PATH -
reads1: This field takes the path to the feature barcode reads1 FASTQ files (technical reads). To get this, run the following command in the terminal:reads1_pat="_R1_" find -L ${FASTQ_DIR}/pbmc_1k_protein_v3_antibody_fastqs -name "*$reads1_pat*" -type f | sort | awk -v OFS=, '{$1=$1;print}' | paste -sd, - -
reads2: This field takes the path to the feature barcode reads2 FASTQ files (biological reads). To get this, run the following command in the terminal:reads2_pat="_R2_" find -L ${FASTQ_DIR}/pbmc_1k_protein_v3_antibody_fastqs -name "*$reads2_pat*" -type f | sort | awk -v OFS=, '{$1=$1;print}' | paste -sd, -
-
As the above commands will return the absolute path to files, which are different in different machines, here we talk about how to correctly update the information in the configuration file instead of showing the complete version of that section. To update the fields, we need to replace the nulls in the file with valid values. For example, to complete the "fasta": null field, we need to replace the null with the “quoted” path to the human genome FASTA file we downloaded (returned by running echo $REF_DIR/fasta/genome.fa), such as
"--fasta": "/path/to/workdir/data/refdata-gex-GRCh38-2020-A/fasta/genome.fa"
Of course, in practice, we need to change /path/to/workdir to the absolute path to our working directory or use the path to another genome FASTA file we want to use. Details about other sections in a configuration Jsonnet program can be found in this section.
5. execute the workflow
With the instantiated template in hands, we can now call simpleaf workflow run to process our data: we pass the instantiated template via the --template flag and (optioanlly) an output directory via the --output flag. The output directory of the workflow can be set in two ways: the --output command line argument and the output field in the meta_info section of the workflow template. If both are set, the output meta-variable in the workflow template will be used.
simpleaf workflow run \
--template $AF_SAMPLE_DIR/10x-feature-barcode-antibody_template/10x-feature-barcode-antibody.jsonnet \
--output $AF_SAMPLE_DIR/workflow_output
When the execution is done, we are done with processing that complicated single-cell gene expression and feature barcode dataset, which consists of a total 12 commands, 4 simpleaf commands, and 7 external shell commands! Are you asking where the outputs are? They are in the $AF_SAMPLE_DIR/workflow_output. If not specified explicitly in the command records in the instantiated template, the actual layout of the output directory will follow the layout of the workflow manifest:
-
All results generated from the commands defined in the
gene_expressionsection are in$AF_SAMPLE_DIR/workflow_output/gene_experssion. The gene expression count matrix can be found at$AF_SAMPLE_DIR/workflow_output/gene_experssion/simpleaf_quant/af_quant/alevin -
All results generated from the commands defined in the
antibody_capturesection are in$AF_SAMPLE_DIR/workflow_output/antibody_capture.The feature barcode count matrix can be found at$AF_SAMPLE_DIR/workflow_output/antibody_capture/simpleaf_quant/af_quant/alevin. -
The evaluted workflow manifest is at
$AF_SAMPLE_DIR/workflow_output/workflow_execution_log.json. For more information about the workflow manifest, please check this section.
7. Clustering analysis
In this section, we follow the Seurat’s tutorial Using Seurat with multimodal data to analyze the quantification we generated from the previous steps.
Before we start, let’s first move to our working directory in our terminal.
cd $AF_SAMPLE_DIR
Now, let’s load the count matrix from our gene expression and feature barcode data, filtering high-quality cells, and run the standard Seurat pipeline on our gene expression count matrix. The following code chunk should be executed in R. If you are using your IDE, please ensure that you are in our working directory, or the loadFry function is run using correct paths.
suppressPackageStartupMessages({
    library(fishpond)
    library(ggplot2)
    library(SingleCellExperiment)
    library(Seurat)
    library(DropletUtils)
})

# set the seed
set.seed(271828)

gex_q <- loadFry('workflow_output/gene_expression/simpleaf_quant/af_quant')
fb_q <- loadFry('workflow_output/antibody_capture/simpleaf_quant/af_quant')

e.out <- emptyDrops(counts(gex_q))
is.cell = e.out$FDR <= 0.01
is.cell[is.na(is.cell)] = FALSE

gid2name_df = read.csv("workflow_output/gene_expression/simpleaf_index/ref/gene_id_to_name.tsv", sep="\t", header = FALSE)
gid2name = gid2name_df[,2]
names(gid2name) = gid2name_df[,1]

gex_q.filt = gex_q[, is.cell]
fb_q.filt = fb_q[, colnames(gex_q.filt)]

rownames(gex_q.filt) = gid2name[rownames(gex_q.filt)]

pbmc <- CreateSeuratObject(counts = counts(gex_q.filt))

adt_assay <- CreateAssayObject(counts = counts(fb_q.filt))

# add this assay to the previously created Seurat object
pbmc[["ADT"]] <- adt_assay

library(RColorBrewer)
my_cols = brewer.pal(8,"Dark2")

DefaultAssay(pbmc) <- "RNA"

pbmc <- NormalizeData(pbmc)
pbmc <- FindVariableFeatures(pbmc)
pbmc <- ScaleData(pbmc)
pbmc <- RunPCA(pbmc, verbose = FALSE)
pbmc <- FindNeighbors(pbmc, dims = 1:30)
pbmc <- FindClusters(pbmc, resolution = 0.8, verbose = FALSE)
pbmc <- RunUMAP(pbmc, dims = 1:30)
# place plots side-by-side
pdf("rna_clusters.pdf",height=6, width=8)
DimPlot(pbmc, label = TRUE,cols=alpha(my_cols,0.66))
dev.off()
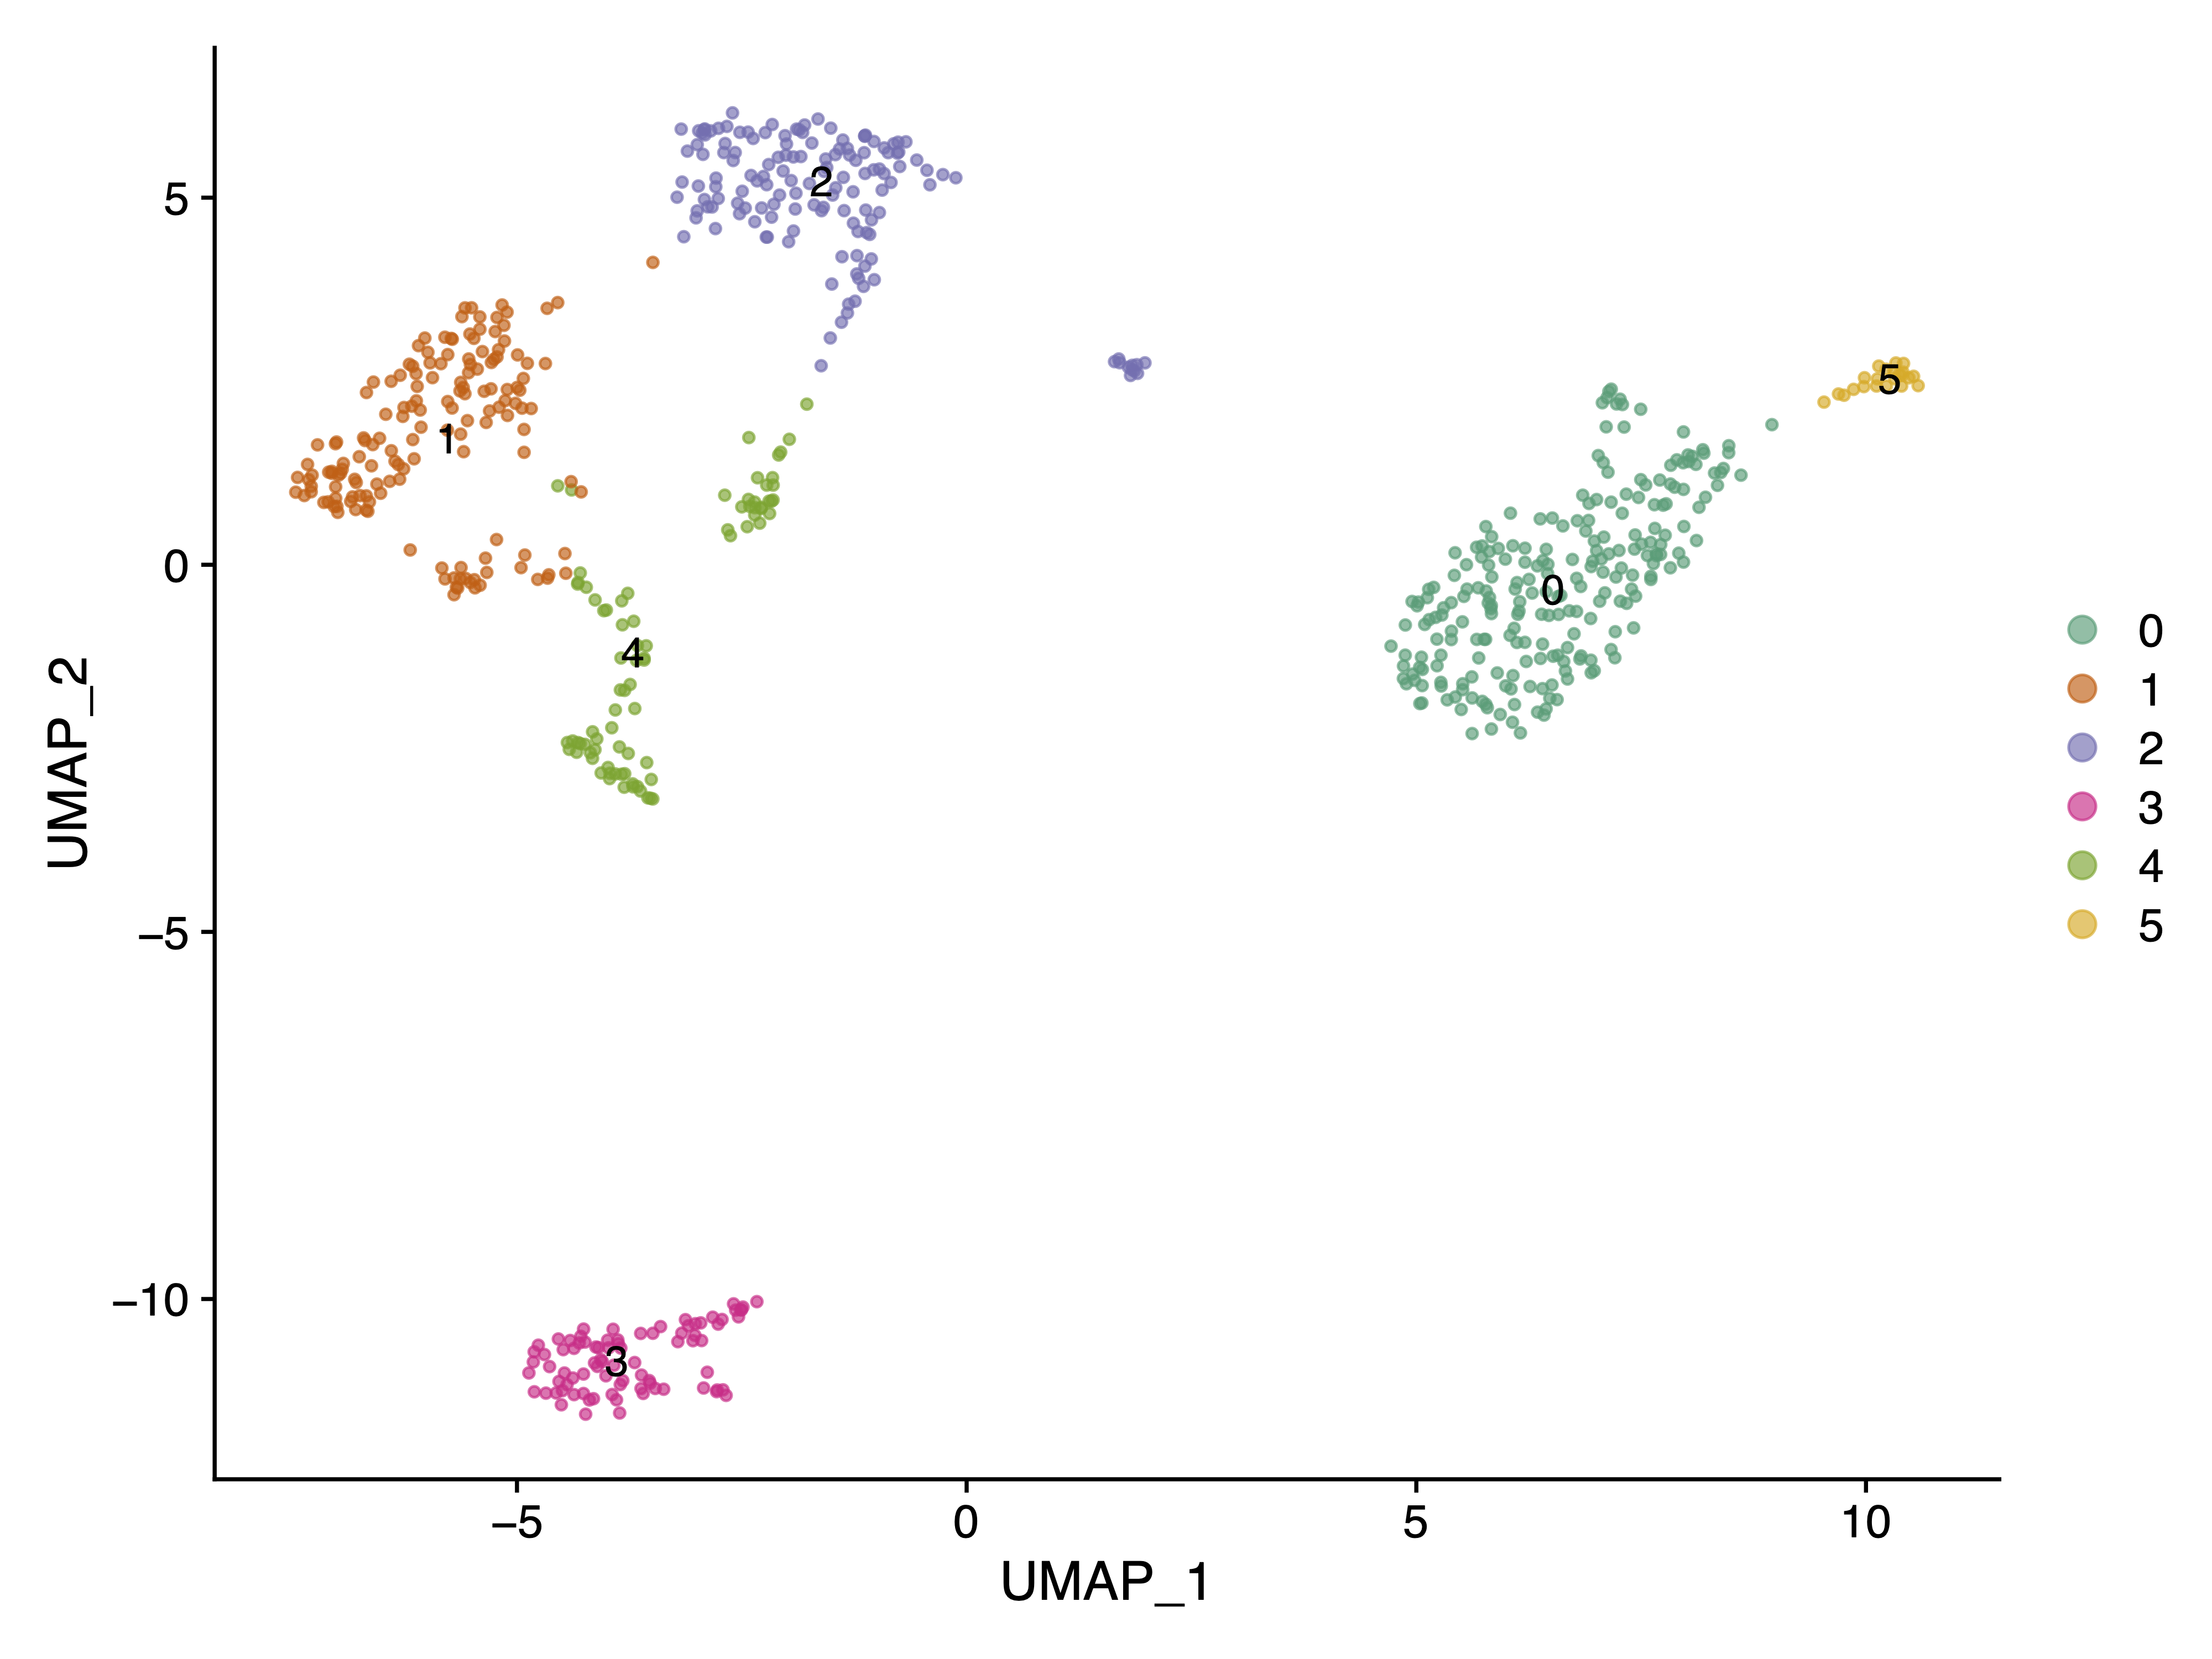 |
|---|
| Fig 1. Cell Clusters UMAP Plot using gene expression count matrix. |
Next, we want to use our feature barcoding data, which tells us the expression of some cell surface marker proteins, to help us assigning the cell types to the clusters we found. Here we will use CD19, which is the surface marker protein of B cells, to find which cluster, among the five clusters we found, is for B cells.
DefaultAssay(pbmc) <- "ADT"
pbmc <- NormalizeData(pbmc, normalization.method = "CLR", margin = 2)
DefaultAssay(pbmc) <- "RNA"

# Note that the following command is an alternative but returns the same result
pbmc <- NormalizeData(pbmc, normalization.method = "CLR", margin = 2, assay = "ADT")

# Now, we will visualize CD14 levels for RNA and protein By setting the default assay, we can
# visualize one or the other
DefaultAssay(pbmc) <- "ADT"
p1 <- FeaturePlot(pbmc, "CD19", cols = c("lightgrey", "darkgreen")) + ggtitle("CD19 protein")
DefaultAssay(pbmc) <- "RNA"
p2 <- FeaturePlot(pbmc, "CD19") + ggtitle("CD19 RNA")

# place plots side-by-side
p1 | p2
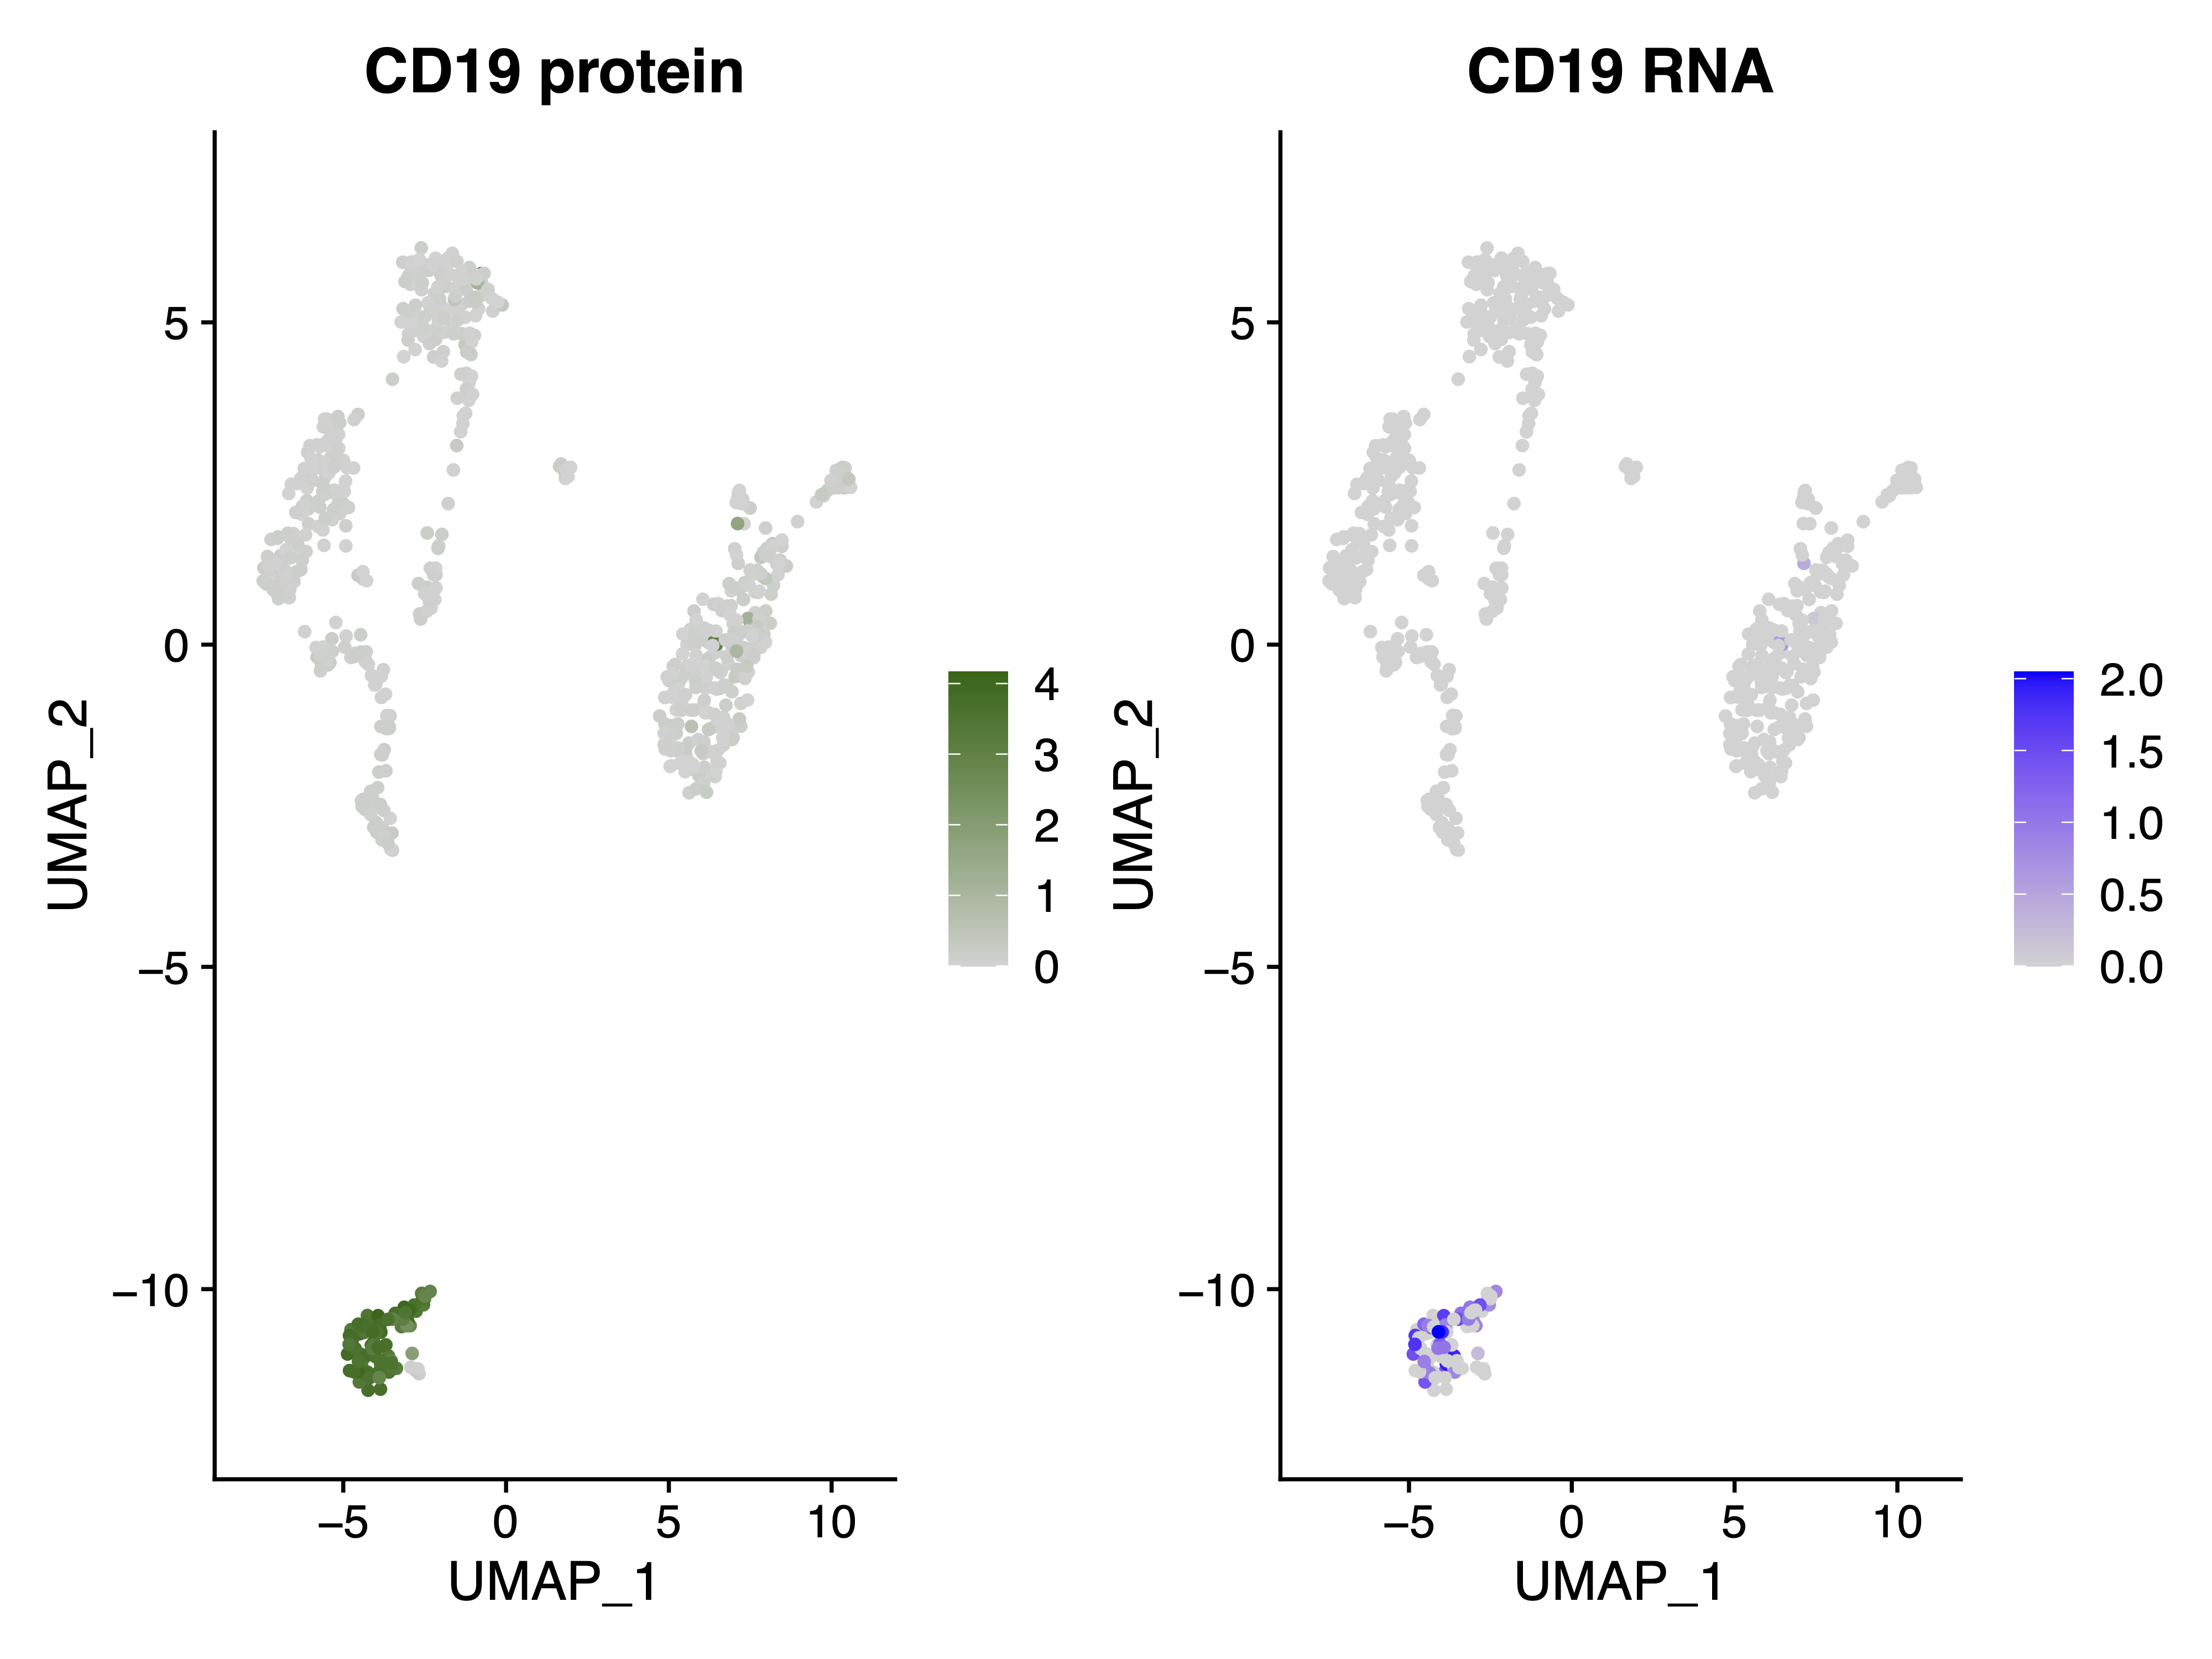 |
|---|
| Fig 2. CD19 Protin(left) and RNA(right) expression in the RNA UMAP plot as Fig 1. |
It is clear that Cluster 3 in Fig 1 represents the B cells, as CD19 is exclusively highly expressed in this cluster.
Patching
In the re-designed simpleaf workflow module, we introduce the simpleaf workflow patch program to help users to modify the templates (in Jsonnet) or manifest (in Json). This program takes either a workflow template via the --template or a workflow manifest via the --manifest flag, together with a patch file via the --patch flag, and patches the provided template or workflow. The patch file is a semicolon-separated values file (ssv?) that contains the modifications to the template or manifest.
Firstly, let’s see an example of a patch file, which should be in a semicolon-separated values file format.
name;<s>/meta_info/output;<n>/meta_info/threads;
patch1;"patch1_output";6
patch2;"patch2_output";8
In the above example, we see three rows and three columns in the patch file.
- The first row contains column names. We require that, except a system column called
name, all other column names should follow the format of value type followed by the path to the field to be patched, represented as<value type>/path/to/target/field/to/be/patched.- The
namecolumn decides the name of the patch. This name will be used as the suffix of the output file name. For example, if we have a patch namedpatch1, the output manifest file name will beoriginal_file_name_patch1.json. <value type>can be either<s>,<n>or<a>, which represent string, number, and array respectively./path/to/target/field/to/be/patchedshould be a valid path in the provided template or manifest. For example, in the above example,<s>/meta_info/outputmeans that we want to patch a string value to theoutputfield in themeta_infosection of the provided template or manifest.<n>/meta_info/threadsmeans that we want to patch a number value to thethreadsfield in themeta_infosection of the template/manifest.
- The
- All following rows contain the patch
name(or say id) and the values to be patched to the fields defined in the column name. In the above example, we have two patch row, the new values in each each patch will be patched to the provided template/manifest to generate a new manifest accordingly. Specifically, when processing the second row,simpleaf workflow patchwill generate a new manifest with theoutputfield in themeta_infosection being updated as"patch1_output"and thethreadsfield in themeta_infosection as6; When processing the third row, it will generate a new manifest with theoutputfield in themeta_infosection being updated as"patch1_output"and thethreadsfield in themeta_infosection as6.
Secondly, we want to explain the behavioral difference between patching a workflow template with patching a workflow manifest.
-
When patching a manifest by a patch record (a row in the patch file), because a manifest is just a JSON record with no variables or functions, the
simpleaf workflow patchprogram override the value of the fields defined in the patch record to the manifest. For example, if we have a patch record like the following:name;<s>/meta_info/output;<n>/meta_info/threads; patch1;"patch1_output";6and we have a manifest like the following:
  {
      "meta_info": {
          "output": "original_output",
          "threads": 8
      },
      "command1": {
          "output" : "original_output/command1_output",
          "threads" : 12
      },
  }
After patching, we will have a new manifest like the following:
  {
      "meta_info": {
          "output": "patch1_output",
          "threads": 6,
      },
      "command1": {
          "output" : "original_output/command1_output",
          "threads" : 12
      },
  }
All fields other than the patched fields in the manifest will remain the same because there is no variable dependeny in the manifest.
-
When patching a template by a patch record, because a template is a Jsonnet program with variables, functions and other features, the
simpleaf workflow patchprogram will override the value of the fields defined in the patch record to the template and re-evaluate the template to generate a new manifest. For example, if we have a patch record like the following:name;<s>/meta_info/output;<n>/meta_info/threads; patch1;"patch1_output";6and we have a template like the following:
  {
      meta_info: {
          output: "original_output",
          threads: 8,
          use_piscem: true,
      },
      workflow: {
          command1: {
              output : meta_info.output + "/command1_output",
              threads : 12
              use_piscem: meta_info.use_piscem,
          },
      },
  }
This template will be evaluated to a manifest like the following:
  {
      "meta_info": {
          "output" : "original_output",
          "threads" : 8,
          "use_piscem" : true,
      },
      "workflow" : {
          "command1": {
              "output" : "original_output/command1_output",
              "threads" : 12,
              "use_piscem" : true,
          },
      },
  }
After patching, we will have a new template like the following:
  {
      meta_info: {
          output: "patch1_output",
          threads: 6,
          use_piscem: true,
      },
      workflow: {
          command1: {
              output : meta_info.output + "/command1_output",
              threads : 12,
              use_piscem: meta_info.use_piscem,
          },
      },
  }
and a new manifest like the following:
  {
      "meta_info": {
          "output": "patch1_output",
          "threads": 6,
          "use_piscem": true,
      },
      "workflow" : {
          "command1": {
              "output" : "patch1_output/command1_output",
              "threads" : 12,
              "use_piscem": true,
          },
      },
  }
Notice that in the final manifest, the
workflow/command1/outputfield, which is not defined in the patch record, is updated because it depends on themeta_info/outputpatch field. On the contrary, theworkflow/command1/threadsfield is not updated because itself is a number and does not depend on the any field, and theworkflow/command1/use_piscemfield is not updated because its dependency stay the same in the patched template.
Details about simpleaf workflow
The simpleaf workflow run program
simpleaf workflow run takes an instantiated simpleaf workflow template (a template jsonnet program with enough information for evaluating the workflow) as the input. During execution, simpleaf will first convert the instantiated template to a workflow manifest in JSON format with the help of Jrsonnet. simpleaf will then search the workflow manifest to find the command records, assemble them and push them into an execution queue. The execution order of the commands depends on the step field of the command record.
simpleaf workflow exposes multiple flags for controlling the execution flow when invoking the commands. If none of these flags is set, simpleaf will invoke all commands in the execution queue.
- If setting the
--no-executionflag, simpleaf workflow will parse the file passed to the--template, write the log files, and return without invoking any command. - If setting the
--start-atflag with astepnumber, simpleaf workflow will ignore previous steps (commands) and begin the invocation from the commands in the execution queue whosestepis larger than or equal to that specificstep. - If setting the
--resumeflag, simpleaf workflow will find the log file of a previous run in the provided output folder to decide whichstepto begin with. - If setting the
--skip-stepflag with a set of comma-separatedstepnumbers, simpleaf workflow will ignore the commands whosestepis in those numbers.
2. The workflow template
Although simpleaf sets no hard format requirment on the workflow template (it will only use this file to produce a workflow manifest), we recommend a workflow template, and most of them do, contain four sections for best practices:
fast_config: This section should contain the minimum configuration that can trigger the default behavior of the workflow. Most users only need to fill in this section to instantiate the workflow template.advanced_config: This seciton should define the alternative behaviors of the workflow. Usually, this section contains the flags of thesimpleafcommands that are not in thefast_configsection.meta_info: This section should contain the meta-variables and meta-information of the workflow.workflow: This section should contain the logics that build the actual workflow commands.
Later, in the evaluated manifest, we require two sections:
meta_info: This section should contain the meta-variables and meta-information of the workflow.workflow: This section should contain the command records of the workflow.
fast_config
This section contains the minimum information to instantiate a workflow template. Each field in this section with a null value will have a detailed description of what the field represents, why we need it, and how to fill it in. In most cases, one can complete this section to instantiate the workflow in the standard and recommended manner. Of course, the users can fill in or modify the value of the fields in other sections if they would like to change the default behavior of the workflow.
meta_info
This section records the meta-variables and meta-information of a template. Usually, the meta-variables defined in this section, for example, output and threads, will be applied to all applicable commands. This might vary because the actual behavior of a Jsonnet program is defined in itself, not in the simpleaf workflow codebase.
For example, in the example template we used above:
-
if one sets the
threadsmeta-variable as"16"(remember that simpleaf workflow templates only take quoted values for arguments), this value will be assigned to all simpleaf commands in the workflow that don’t have this flag set. -
As for
output, simpleaf automatically pass a__outputexternal variable to the template during evaluation corresponding to the value passed to the--outputcommand line argument. In all protocol-estuary templates, we ask the users to at least set theoutputonce, either in themeta_infosection or via the--outputflag, to ensure that the output directory of each workflow command is set correctly.
This section also contains valuable meta information, such as the workflow name and version.
advanced_config
This section contains the options that can be used to overwrite the default (and recommended) behavior of a workflow. Usually, this section lists the flags of each simpleaf command that are not in the fast_config section. One can modify the fields in this section to overwrite the defaults.
For example, in the example configuration program discussed above, if we have an existing human splici reference salmon index and we would like to use it instead of building a new one, we can set the reference type as "existing_index" in for the advanced_config/ref_type/type field, and provide the path to the index directory and the transcript-to-gene-map TSV file to the advanced_config/ref_type/existing_index/index and advanced_config/ref_type/existing_index/tx2gene fields respectively.
The modified configuration file will look like the following (with all other fields ignored):
advanced_config: {
    gene_expression: {
        simpleaf_index: {
            ref_type : {
                type : "existing_index", # changed from "splici" to "existing_index"
                existing_index : {
                    index : "/path/to/existing/index", # filled with the path to the existing index
                    t2g_map : "/path/to/t2g_3col.tsv", # filled with the path to the tx2gene.tsv file
                },
            },
        },
    },
}
By doing this, the workflow will use the existing index instead of building a new index by executing the simpleaf index command.
3. The workflow manifest
A workflow manifest refers to the JSON record that is manifested from an instantiated workflow template Jsonnet program. Simpleaf requires that each workflow manifest must be able to generate a manifest with a meta_info section and a workflow section. The meta_info section contains the meta-variables and meta-information of the workflow, and the workflow section contains the command records of the workflow.
Usually, the meta_info section in a workflow manifest contain at least three fields:
template_name: The name of the workflow template.template_version: The version of the workflow template.output: The output directory of the workflow.
The workflow section in a workflow manifest contains the command records of the workflow. Each command record must contains the following system fields:
program_name: The name of the command program.step: The step number of the command. This field is used to control the execution order of the commands.active: The active status of the command. This field is used to control the execution of the commands. If this field is set tofalse, the command will be ignored during execution. Then, depending on the command type, the command record may contain other fields.
For external commands, the command record must contain the arguments field, which is an array of string listing all the arguments of the command.
{
    "program_name": "echo",
    "step": 1,
    "active": true,
    "arguments": [
        "Hello World!"
    ]
}
For simpleaf commands, each field, except the three system fields listed above, must represent a valid argument, value pair of the command. For example, the following command record is for the simpleaf index command:
"simpleaf_index": {
    "program_name": "simpleaf index",
    "active": true,
    "step": 1,
    "--fasta": "/mnt/scratch3/alevin_fry_submission/refs/refdata-gex-GRCh38-2020-A/fasta/genome.fa",
    "--gtf": "/mnt/scratch3/alevin_fry_submission/refs/refdata-gex-GRCh38-2020-A/genes/genes.gtf",
    "--output": "workflow_output/gene_expression/simpleaf_index",
    "--ref-type": "spliceu",
    "--threads": 16
}
When executing the workflow, simpleaf workflow run will search the workflow manifest to find the command record with the three system fields, assemble them and push them into an execution queue. Therefore, the structure of the workflow manifest is not fixed, and the users can put the command records in nested layers as long as the three system fields are in the command record.
4. The validity of a workflow manifest and debugging
Although simpleaf workflow can take any valid Jsonnet program as the input, it will complain if the resulting JSON configuration is not a proper simpleaf workflow manifest according to some defined fields.
Usually, for a well-designed workflow template, like those published in protocol esturary, a valid workflow manifest can be generated as long as the missing fields in the fast_config section are all filled in. For users who want to enable some advanced flags in the simpleaf commands, if bugs occur, we would suggest the users follow the running logging we provided, as it will show the encountered errors are caused by what command in which step, and will provide a detailed error message to help you debug.
Suppose the error occurs when invoking a command. In that case, we suggest debugging according to the detailed error messages reported by simpleaf, fixing the bug in the instantiated template, and rerunning the workflow using simpleaf workflow run --resume. By setting the --resume flag, simpleaf will not rerun the commands that returned successfully. If you have further questions, please do not hesitate to ask by starting a GitHub issue!
Summary
In conclusion, simpleaf workflow provides the ability to execute complex and highly-configurable single-cell data processing workflows consisting of simpleaf commands and shell commands, described by simple user-provided configuration files. Many well-designed workflows are available on protocol estuary and can be easily obtained from the simpleaf workflow get program.